Host your Deep Learning model on AWS Free Tier
In this article, I will tell step by step how I hosted my deep-learning model using amazon’s AWS EC2 Free Tier instance for non-production loads and fastai library. You can use any library for DL/ ML model development. I will focus more on how to deploy your model in production. I am assuming that you have exported your machine learning model into a pickle file (eg. export.pkl file) and you have an AWS account. I will be using flask as a backend server, gunicorn and NGINX as a reverse proxy server.
If you do not have an AWS account, you can create one for free here.

Step 1: AWS server creation & firewall setup:
Before you can launch and connect to an Amazon EC2 instance, you need to create a key pair, unless you already have one. You can create a key pair using the Amazon EC2 console (https://amzn.to/2Lw5W4d).
When you sign up for AWS, you can get started with Amazon EC2 using the AWS Free Tier. (Provided you created your AWS account less than 12 months ago, and have not already exceeded the free tier benefits for Amazon EC2). I chose ubuntu image with deep learning support. For instance type, I selected general purpose free tier eligible, t2 micro instance. Below I have shown step wise approach to setup AWS instance.


Your instance will need an elastic IP ( static IP) so that its IP address remains the same even after a reboot. To assign an elastic IP to your instance, follow the steps below:
Log in to the AWS EC2 Dashboard.
Select the instance in the dashboard.
In the left navigation bar, select the “Network & Security -> Elastic IPs” menu item.
Click the “Allocate New Address” button.

Click “Allocate” in the next screen.

A new static IP address will be generated and will appear in the list of available IP addresses.

Next, from the “Actions” drop-down menu, select the “Associate Address” menu item.

In the resulting dialog box, enter the instance ID of your server and click the “Associate” button.

To allow your server to receive incoming requests, you need to make necessary changes to the firewall. Follow the steps shown below to do same:
Login to AWS account and navigate to EC2 management console. Go to Security Groups under Network & Security menu as highlighted below :

On Security Groups screen select your EC2 server and under Actions menu select Edit inbound rules.

Now you will be presented with inbound rule window. You can add/edit/delete inbound rules here. There are several protocols like http, nfs etc listed in the drop-down menu which auto-populate ports for you. If you have custom service and port you can define it too. We will choose tcp protocol here.

That’s it. Once you save these settings your server inbound port 80 is open! you can check by telneting to port 80 for your EC2 server public DNS (can be found it EC2 server details)
Solution Overview:
The technology stack we will be using for server creation is:
FLASK + GUNICORN + SUPERVISOR + NGINX
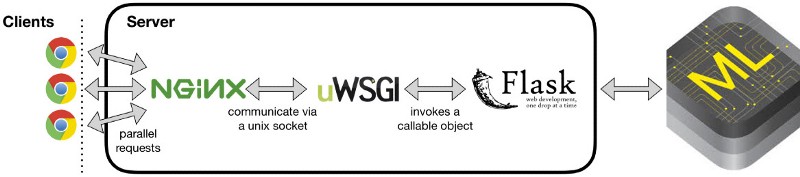
FLASK: Flask is a great python module to create API server using decorators to associate functions to URL routes. It has really great documentation and is easy to understand(http://flask.pocoo.org/). We will use flask to create back-end server.
GUNICORN: Gunicorn ‘Green Unicorn’ is a Python WSGI HTTP Server for UNIX. Basically, it will act as an interface between Flask and NGINX.
SUPERVISOR: Supervisor allows to monitor and control a number of processes on UNIX-like operating systems. Supervisor will look after the Gunicorn process and make sure that they are restarted if anything goes wrong, and also it will make sure the processes are started at boot time of instance.
NGINX: Nginx is a web server that can also be used as a reverse proxy, load balancer, mail proxy and HTTP cache. In our case, NGINX will receive client requests and pass it on to gunicorn.
That’s the intro of all software stack we will be using, now let’s move on implementation part.
Step 2: Copy model file to the server:
Copy your export.pkl file and your python program that can read it to the instance using scp command.
scp -i <path to ssh private key> <source file> <user>@<IP address>:<destination path>
Step 3: Downloading and setting up necessary packages:
Run following commands in AWS EC2 Ubuntu instance:
$ sudo apt-get install nginx supervisor$ pip install Flask$ pip install gunicorn
Step 4: Setting up Flask:
In the folder where you have saved your export.pkl create api.py. Below is code of sample api.py.
In this case, we have built an image classification model. You can see how I imported the mode using load_learner() method of fastai. For different machine learning libraries like tensorflow you can use corresponding methods to load your model.
You can have your own definition of predict() function. I am using image-classification and returning the probability of each class for the input image.
Method app.run() launches api at host=’127.0.0.1'.
import osimport flaskfrom fastai import *from fastai.vision import *import numpy as npfrom flask import Flask, render_template, request ,jsonifyimport collectionsapp = Flask(__name__)model=load_learner(os.getcwd(),'export.pkl')classes=model.data.classes@app.route("/")@app.route('/predict', methods=['POST'])def predict():if request.method=='POST':file = request.files['image']########################################################/* code to get result from classifier */########################################################if __name__ == '__main__':app.run(host='127.0.0.1',threaded=True)
Verifying flask setup:
$ python api.py
To verify the working of flask, you can copy api.py and export.pkl in a separate directory in your local machine. Run the above command if it runs successfully then you can send a post request to
<IP address>:5000/predict and receive a response. (By default flask runs on port 5000, hence the 5000 after the IP address). Note: I am assuming you have all dependencies to run the code, installed in your local machine too.
Use ctrl + c to exit flask server.
Step 5: Setting up Gunicorn:
Now we will run our api.py with help of gunicorn.
gunicorn api:app -b 127.0.0.1:8000 &
Verifying gunicorn:
If the above command runs successfully you will see 2 gunicorn processes running. To check the proper execution of gunicorn you can use postman(https://bit.ly/2M6wPuH) and send request to your server.

Step 6: Setting up NGINX:
We have to define the process block for our flask API. Run the following code in your EC2 AWS instance terminal.
$ cd/etc/nginx/sites-available$ mkdir myproject$ cd myproject$ nano myproject
Inside myproject paste:
server {listen 80;server_name 174:33:22:11;location / {include proxy_params;proxy_pass http://127.0.0.1:8000;}}
replace 174:33:22:11 with instance’s IP address.
To verify NGINX setup:
At this point, you should be able to call the API from any machine using postman or another request library. If you get the desired response, Your flask model is working successfully.
Next what we can do to make better is manage our server. We might want that our model runs in the background every time and we may also want it to automatically restart if it shutdowns. We will use supervisor for this.
Step 7: Setting up supervisor:
Supervisor will look after the Gunicorn process and make sure that they are restarted if anything goes wrong, or to ensure the processes are started at boot time. Create a supervisor file in /etc/supervisor/conf.d/ and configure it according to your requirements.
[program:MyProjectServiceSupervisor]directory=/home/ubuntu/food_detectorcommand=/home/ubuntu/anaconda3/bin/gunicorn -w 1 --bind 0.0.0.0:5000 api:appautostart=trueautorestart=truestderr_logfile=/var/log/<path to file>/hello_world.err.logstdout_logfile=/var/log/<path to file>/hello_world.out.log
Save this file with .conf extension.
Run the following commands:
$ sudo supervisorctl reread$ sudo service supervisor restart
To verify the successful setup of supervisor run:
$ sudo supervisorctl status
Above command will give the process id and all other info about the process being monitored. We can stop and start our gunicorn service anytime by typing:
$ sudo supervisorctlsupervisor> stop <servicename>supervisor> start <servicename>
References:
https://kerneltalks.com/virtualization/how-to-open-port-on-aws-ec2-linux-server/https://www.digitalocean.com/community/tutorials/how-to-serve-flask-applications-with-gunicorn-and-nginx-on-ubuntu-14-04https://medium.com/ymedialabs-innovation/deploy-flask-app-with-nginx-using-gunicorn-and-supervisor-d7a93aa07c18
Author:
RISHABH SHUKLA
Jash Data Sciences